Set up a simple graphics card mining P.C. (RIG)
A bespoke ASIC is needed to mine Bitcoin (BTC) these days but other Blockchains are still available to be mined using graphics cards what follows is an example for mining Ethereum Classic Coin (ETC) as of 2021, where when the mining difficulty of Ethereum Classic Coin goes up to the point the following example machine struggles to mine this coin you can then consider flicking over to another Blockchain and mining that instead like Cardano (ADA) coin say or Nano (Nano) coin or Tron coin(TRX) to name but a few.
Making a simple mining rig is easy you can expand all this up as you get used to it but below is a minimal example of one to start you off and to work with.
Start by making a regular decent P.C. tower, if you buy one off a shelf its usually just a waste of money, it’s easier just to make a P.C as you get better components for your money, it only takes a day and everything just fits in the place it needs to go so you can’t go wrong. A component should just gently push in to a slot that it’s designed to go in so just remember never try to force components in to a slot. Where if you are unsure Youtube has plenty of tutorials on there you can always watch to get more of an idea.
Buy:
1) A P.C. Tower case, a large one is handy as it allows more air to flow through it. Most of us leave the side of the case off as to promote air flow through it to help cool all the components.
2) A decent motherboard to put in the tower, this is an easy install, just screw the little screws that come with the motherboard in to the P.C. tower to fix it in position.
3) A processor that matches the motherboard which you can just slot gently in to the motherboard. Check which way it inserts by the pins and the shape of the socket it goes in to.
4) A syringe of thermal transfer paste, once the processor is in the motherboard just squeeze the paste out on to the top of the processor this enables the heat to transfer from the processor to the cooling block or radiator.
5) A large cooling block with fan to go on the processor, or treat your-self and get a water radiator cooling block instead, they are really cheap these days. It sounds cool and complicated but it just clicks on to the processor like a cooling block and fan does.
6) Some decent RAM just slot it in to the motherboard, you don’t need loads for crypto mining as most resources used to mine the Blockchain are used on the graphics card rather than the motherboard. 16GB or 32GB of reasonably priced RAM is more than enough.
7) An SSD, 250gb – 1TB is fine you won’t use hardly any storage space on the machine to mine its mainly just for the operating system.
8) A 750 watt PSU, this is enough to power two graphics cards and the system won’t use the full 750watts of power all the time with the other components, it’s just nice to have it available.
9) 1 or 2 graphics cards, say 2 x RX580 8GB Radeon Sapphire Graphics cards.
10) An operating system like Windows 7, Windows 10, you can probably install Linux free to but for convenience I would say take a cheap copy of Windows.
11) A decent firewall program it’s just good practice and a program like ESET Smart Security is easy to use and good for peace of mind.
Following are examples of the specs that match the above layout and their prices, where you can make an Intel version all the same, the below specs are just a decent example of a reasonably priced machine that will do the job nicely.
1) Large P.C. tower case - £50
2) Gigabyte motherboard AM3+ socket - £100
3) AMD FX-6300 Six core Piledriver - £50
4) A syringe of thermal transfer paste - £3
5) Dual water radiator to cool the Piledriver processor - £50
6) 2x 8GB sticks of ram, DDR3 1600mhz - £70
7) Samsung EVO 840 250GB - £40
8) Corsair CX750w Power supply - £70
9) 2 x RX580 8GB Radeon Sapphire Graphics cards – 2 x £300 = £600
10) Windows 7 disc - £40
11) ESET firewall for a year - £50
For a total cost of £1123.
You can drop the price and just use the one graphics card to start off mining with for a closer price to £823 and can always expand it up later, or even spend on more expensive graphics cards and other components or clone this setup as many times as you would like. These mining rigs are often down to an individual’s taste and the different takes on mining the Blockchains.
Now you have a decent P.C. tower (RIG) to mine on you can consider how you would like to mine. A lot like myself like to mine in a ‘mining pool’ this is to say mine (help facilitate/process transactions on the network) in a group, but you can always mine on your own if you would like to.
We mine using ‘mining program’s. Both the ‘mining pool’ and the ‘mining program’ will likely take a really small percentage of what you mine but its negligible so no one minds. For this following example it will consider you are the same and are happy mining in both a mining pool and using a mining program someone else has written. There are many mining pools and programs out there, the following are just one example of a setup where you can always Google others and see what you fancy on Reddit for example.
A common mining program used is one called ‘Phoenix Miner’ there are many different versions of it available on the web, the latest version is usually the best, but they all work the same, it’s just the new ones often have their architectures updated to enable new and more devices to be used to mine on them, where sometimes new Blockchains are added to them to.
You can read about and download Phoenix Miner here: https://bitcointalk.org/index.php?topic=2647654.0 After you download it extract it from its compressed file to a folder on your hard drive. In the folder you will see these files:

Right click on the .bat file that is called ‘start_miner_etc.bat’ and click edit and load it in a text document and you will see it says:
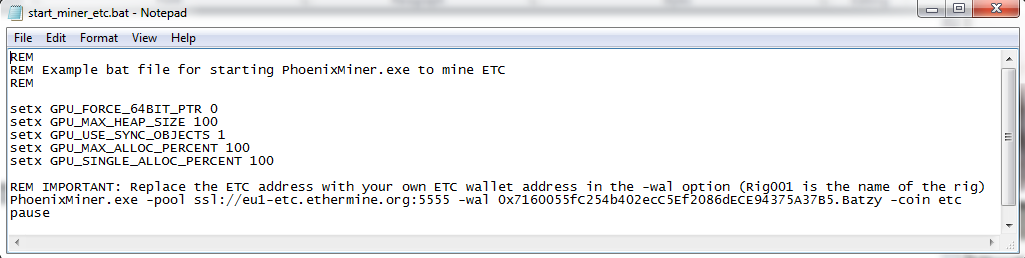
Select the wallet address that is already in there, here the example is 0x7160055fC254b402ecC5Ef2086dECE94375A37B5 then paste your own ETC wallet address over it.
Save the file and close it.
Now your wallet address is in there simply double click the ‘start_miner_etc.bat’ file and congratulations the program will find your graphics card(s) and start mining.
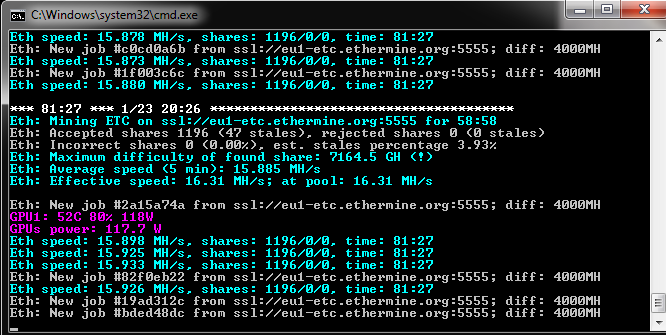
Yep that’s all there is to it.
The temperature, fan speed and wattage of the graphics cards are in purple.
How fast they are mining is in blue in MH/S, along with how many shares have been found to date and the time the program has been running in hours and minutes.
Along with the new jobs that are being supplied by the pool in white.
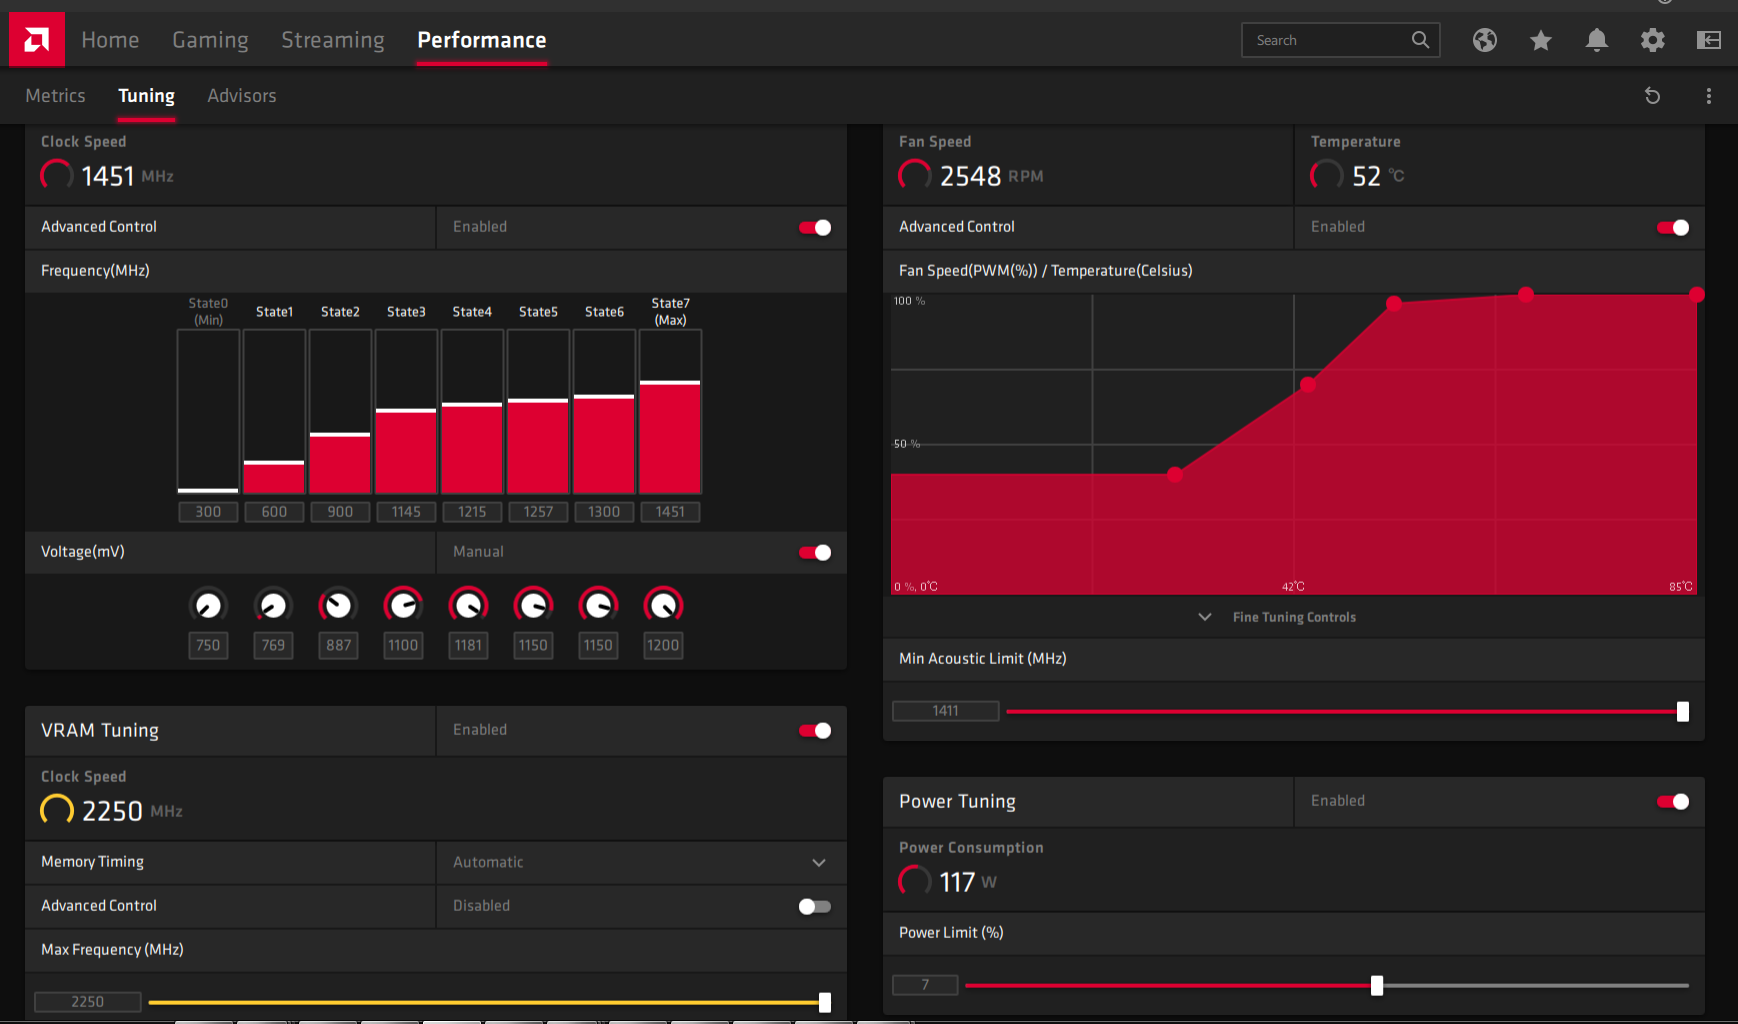
To improve the hash speeds and rewards you can go in to your graphics card settings and tweak the settings there, below you can see for the Radeon RX580 I have maxed the voltage, maxed the clock speed and boosted the fan speeds.
Additional note:
Windows 10 has ‘AMD Compute mode’ set to on as its default where Windows 7 comes with it off, if you are using Windows 7 you can turn it on by checking out the free program available here https://bitcointalk.org/index.php?topic=2815803.0 or you can Google it to do it manually by updating the registry.
Enjoy your mining, you can keep track of what you have mined live on the net at https://etc.ethermine.org/